


How to Make Ice Without Electricity (Inspired by Ancient Persian Yakhchāls)
Simple English • Step-by-step • Anyone can learn and try
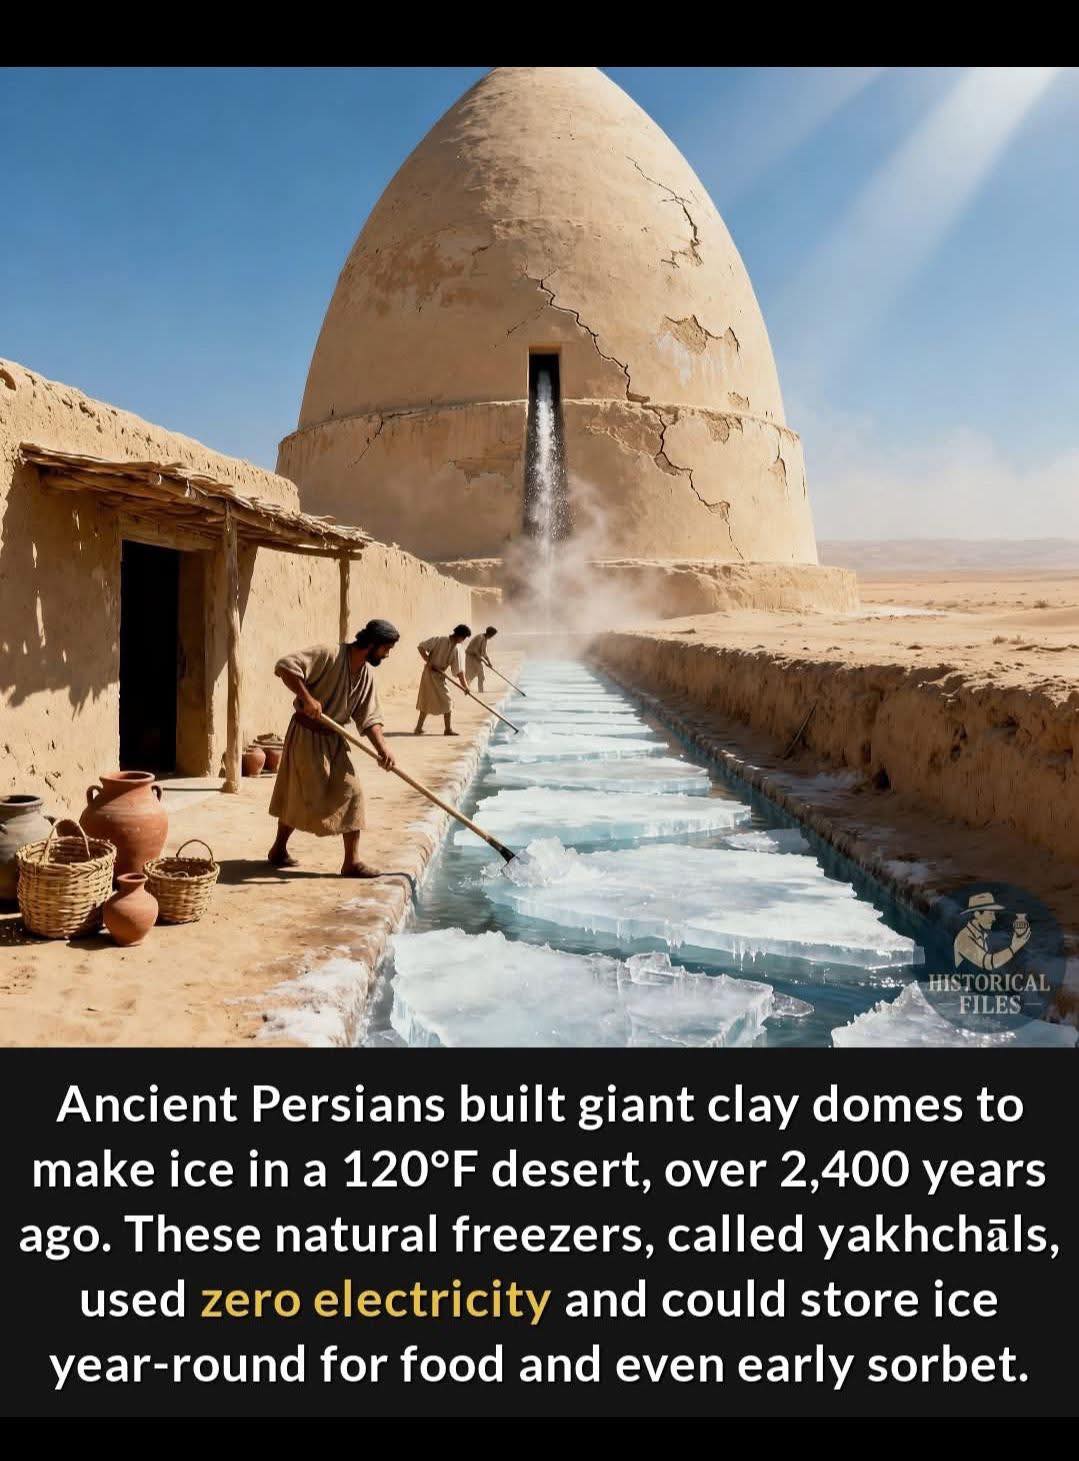
For thousands of years before electricity, people in hot deserts found clever ways to make and store ice. They did this with nothing more than clay, wind, shade, and smart engineering. The Persians perfected this system using a big clay dome called a yakhchāl — the world’s first natural refrigerator.
Today, you can use the same ideas anywhere, even in a village, desert, or farm, with very basic materials.
This essay explains exactly how it works and how you can build a small or large version yourself.
⸻
PART 1: The Basic Science You Need to Know
You don’t need to be a scientist for this. Just understand three simple truths:
1. Water freezes when heat escapes
If you remove heat from water faster than it enters, water turns into ice.
2. Heat escapes fastest at night
At night the ground cools, the air cools, and the sky becomes a giant heat-absorbing refrigerator.
3. Shade + wind + evaporation = cooling
Clay, mud, sand, and water can become natural air conditioners.
The Persians did not “freeze water in summer.”
They froze water in cold winter nights and stored it through summer.
You can copy the same method today.
⸻
PART 2: How to Make Ice Without Electricity
There are two methods you can use:
⸻
METHOD 1: Small-Scale Ice Making (Anyone Can Do This)
You need:
• A shallow metal or clay tray
• A clear sky night
• A shaded area with a wall
• Low wind (optional but helpful)
Steps:
1. Place the tray outside at night.
The thinner the water layer, the faster it freezes.
2. Use a wall or shaded area to block warm evening wind.
The wall cools down at night and radiates cold.
3. Expose the tray to the open sky.
Heat escapes upward into the cold night sky.
4. If the temperature falls below 0°C, the tray will freeze a thin layer of ice.
5. Collect ice in the morning.
This simple “night freezing method” was used in ancient India, China, Persia, and even Europe.
You can do this today anywhere that gets winter nights below freezing.
⸻
METHOD 2: Make a Modern Mini-Yakhchāl (Works Even in Hot Places)
This is for places where days are hot but winter nights get cold for a few hours.
Materials:
• Clay bricks or mud
• Straw + sand
• Stones
• Water
• A shovel
• Optional: bamboo, wooden poles, thatch roof
Structure:
You will build two things:
1. A SHALLOW FREEZING POOL
• Dig a long, shallow rectangle:
Length: 10–20 ft
Depth: 5–10 cm (very shallow)
• Line it with clay or a plastic sheet
• The thinner the water, the faster it turns to ice
2. A BIG SHADE WALL
• Build a tall wall (8–15 ft high) on the west side of the pool
• This wall blocks sunlight
• At night the wall becomes cold and helps freeze the water
How it works:
1. During a cold night, heat escapes from the thin water layer into the sky.
2. The wall radiates cold back into the water.
3. By morning, the pool has frozen sheets of ice.
4. You break the ice and move it to your storage area.
⸻
PART 3: How to Store Ice For Months (The Mini Yakhchāl Dome)
You need:
• Clay mud
• Straw
• Sand
• Stones
• A deep pit
Steps:
1. Dig a deep pit
Depth 8–10 ft
Diameter 6–10 ft
This underground area naturally stays cool.
2. Build thick insulated walls
Use a mixture of:
• clay
• sand
• lime
• ash
• straw
This mixture is waterproof and heatproof — the same used in old Persian yakhchāls.
Make the walls 50–80 cm thick.
3. Create a dome over the pit
The dome shape:
• pushes hot air upward
• keeps cold air trapped down
You can make the dome with:
• clay bricks
• mud + straw layers
• thatch roofing (cheap option)
4. Add a small ventilation hole
Keep it very small.
This removes moisture but keeps the cold inside.
5. Fill the pit with layers of ice + straw
Straw prevents ice blocks from sticking to each other.
6. Seal the entrance during summer
Opening it only when needed keeps ice safe for months.
⸻
PART 4: Why This Works (Simple Explanation)
The system works because of three powerful natural laws:
1. Underground is cold
The deeper you go, the cooler it gets.
2. Thick clay walls stop heat
Clay removes heat very slowly.
3. Evaporation cools air
Clay absorbs moisture and releases it, dropping temperature inside.
Together, this becomes a natural refrigerator.
⸻
PART 5: Can Anyone Build This Today? Yes.
You don’t need electricity
You don’t need machinery
You don’t need expensive materials
You only need:
• Clay
• Sand
• Water
• Straw
• A cold night
• A little work
This is extremely useful for:
• Villages without electricity
• Disaster zones
• Nomads
• Farms
• Places with water shortages
• Eco-friendly homesteads
• Outdoor camps
⸻
PART 6: Modern Improvements You Can Add
If you want even better results:
1. Paint the dome white
White reflects heat.
2. Add a double-layer wall
Air trapped between two clay walls increases insulation.
3. Add a small solar chimney
This pulls hot air upward and out.
4. Use bamboo mats inside
This adds humidity control.
Simple English • Step-by-step • Anyone can learn and try
For thousands of years before electricity, people in hot deserts found clever ways to make and store ice. They did this with nothing more than clay, wind, shade, and smart engineering. The Persians perfected this system using a big clay dome called a yakhchāl — the world’s first natural refrigerator.
Today, you can use the same ideas anywhere, even in a village, desert, or farm, with very basic materials.
This essay explains exactly how it works and how you can build a small or large version yourself.
⸻
PART 1: The Basic Science You Need to Know
You don’t need to be a scientist for this. Just understand three simple truths:
1. Water freezes when heat escapes
If you remove heat from water faster than it enters, water turns into ice.
2. Heat escapes fastest at night
At night the ground cools, the air cools, and the sky becomes a giant heat-absorbing refrigerator.
3. Shade + wind + evaporation = cooling
Clay, mud, sand, and water can become natural air conditioners.
The Persians did not “freeze water in summer.”
They froze water in cold winter nights and stored it through summer.
You can copy the same method today.
⸻
PART 2: How to Make Ice Without Electricity
There are two methods you can use:
⸻
METHOD 1: Small-Scale Ice Making (Anyone Can Do This)
You need:
• A shallow metal or clay tray
• A clear sky night
• A shaded area with a wall
• Low wind (optional but helpful)
Steps:
1. Place the tray outside at night.
The thinner the water layer, the faster it freezes.
2. Use a wall or shaded area to block warm evening wind.
The wall cools down at night and radiates cold.
3. Expose the tray to the open sky.
Heat escapes upward into the cold night sky.
4. If the temperature falls below 0°C, the tray will freeze a thin layer of ice.
5. Collect ice in the morning.
This simple “night freezing method” was used in ancient India, China, Persia, and even Europe.
You can do this today anywhere that gets winter nights below freezing.
⸻
METHOD 2: Make a Modern Mini-Yakhchāl (Works Even in Hot Places)
This is for places where days are hot but winter nights get cold for a few hours.
Materials:
• Clay bricks or mud
• Straw + sand
• Stones
• Water
• A shovel
• Optional: bamboo, wooden poles, thatch roof
Structure:
You will build two things:
1. A SHALLOW FREEZING POOL
• Dig a long, shallow rectangle:
Length: 10–20 ft
Depth: 5–10 cm (very shallow)
• Line it with clay or a plastic sheet
• The thinner the water, the faster it turns to ice
2. A BIG SHADE WALL
• Build a tall wall (8–15 ft high) on the west side of the pool
• This wall blocks sunlight
• At night the wall becomes cold and helps freeze the water
How it works:
1. During a cold night, heat escapes from the thin water layer into the sky.
2. The wall radiates cold back into the water.
3. By morning, the pool has frozen sheets of ice.
4. You break the ice and move it to your storage area.
⸻
PART 3: How to Store Ice For Months (The Mini Yakhchāl Dome)
You need:
• Clay mud
• Straw
• Sand
• Stones
• A deep pit
Steps:
1. Dig a deep pit
Depth 8–10 ft
Diameter 6–10 ft
This underground area naturally stays cool.
2. Build thick insulated walls
Use a mixture of:
• clay
• sand
• lime
• ash
• straw
This mixture is waterproof and heatproof — the same used in old Persian yakhchāls.
Make the walls 50–80 cm thick.
3. Create a dome over the pit
The dome shape:
• pushes hot air upward
• keeps cold air trapped down
You can make the dome with:
• clay bricks
• mud + straw layers
• thatch roofing (cheap option)
4. Add a small ventilation hole
Keep it very small.
This removes moisture but keeps the cold inside.
5. Fill the pit with layers of ice + straw
Straw prevents ice blocks from sticking to each other.
6. Seal the entrance during summer
Opening it only when needed keeps ice safe for months.
⸻
PART 4: Why This Works (Simple Explanation)
The system works because of three powerful natural laws:
1. Underground is cold
The deeper you go, the cooler it gets.
2. Thick clay walls stop heat
Clay removes heat very slowly.
3. Evaporation cools air
Clay absorbs moisture and releases it, dropping temperature inside.
Together, this becomes a natural refrigerator.
⸻
PART 5: Can Anyone Build This Today? Yes.
You don’t need electricity
You don’t need machinery
You don’t need expensive materials
You only need:
• Clay
• Sand
• Water
• Straw
• A cold night
• A little work
This is extremely useful for:
• Villages without electricity
• Disaster zones
• Nomads
• Farms
• Places with water shortages
• Eco-friendly homesteads
• Outdoor camps
⸻
PART 6: Modern Improvements You Can Add
If you want even better results:
1. Paint the dome white
White reflects heat.
2. Add a double-layer wall
Air trapped between two clay walls increases insulation.
3. Add a small solar chimney
This pulls hot air upward and out.
4. Use bamboo mats inside
This adds humidity control.
How to Make Ice Without Electricity (Inspired by Ancient Persian Yakhchāls)
Simple English • Step-by-step • Anyone can learn and try
For thousands of years before electricity, people in hot deserts found clever ways to make and store ice. They did this with nothing more than clay, wind, shade, and smart engineering. The Persians perfected this system using a big clay dome called a yakhchāl — the world’s first natural refrigerator.
Today, you can use the same ideas anywhere, even in a village, desert, or farm, with very basic materials.
This essay explains exactly how it works and how you can build a small or large version yourself.
⸻
PART 1: The Basic Science You Need to Know
You don’t need to be a scientist for this. Just understand three simple truths:
1. Water freezes when heat escapes
If you remove heat from water faster than it enters, water turns into ice.
2. Heat escapes fastest at night
At night the ground cools, the air cools, and the sky becomes a giant heat-absorbing refrigerator.
3. Shade + wind + evaporation = cooling
Clay, mud, sand, and water can become natural air conditioners.
The Persians did not “freeze water in summer.”
They froze water in cold winter nights and stored it through summer.
You can copy the same method today.
⸻
PART 2: How to Make Ice Without Electricity
There are two methods you can use:
⸻
METHOD 1: Small-Scale Ice Making (Anyone Can Do This)
You need:
• A shallow metal or clay tray
• A clear sky night
• A shaded area with a wall
• Low wind (optional but helpful)
Steps:
1. Place the tray outside at night.
The thinner the water layer, the faster it freezes.
2. Use a wall or shaded area to block warm evening wind.
The wall cools down at night and radiates cold.
3. Expose the tray to the open sky.
Heat escapes upward into the cold night sky.
4. If the temperature falls below 0°C, the tray will freeze a thin layer of ice.
5. Collect ice in the morning.
This simple “night freezing method” was used in ancient India, China, Persia, and even Europe.
You can do this today anywhere that gets winter nights below freezing.
⸻
METHOD 2: Make a Modern Mini-Yakhchāl (Works Even in Hot Places)
This is for places where days are hot but winter nights get cold for a few hours.
Materials:
• Clay bricks or mud
• Straw + sand
• Stones
• Water
• A shovel
• Optional: bamboo, wooden poles, thatch roof
Structure:
You will build two things:
1. A SHALLOW FREEZING POOL
• Dig a long, shallow rectangle:
Length: 10–20 ft
Depth: 5–10 cm (very shallow)
• Line it with clay or a plastic sheet
• The thinner the water, the faster it turns to ice
2. A BIG SHADE WALL
• Build a tall wall (8–15 ft high) on the west side of the pool
• This wall blocks sunlight
• At night the wall becomes cold and helps freeze the water
How it works:
1. During a cold night, heat escapes from the thin water layer into the sky.
2. The wall radiates cold back into the water.
3. By morning, the pool has frozen sheets of ice.
4. You break the ice and move it to your storage area.
⸻
PART 3: How to Store Ice For Months (The Mini Yakhchāl Dome)
You need:
• Clay mud
• Straw
• Sand
• Stones
• A deep pit
Steps:
1. Dig a deep pit
Depth 8–10 ft
Diameter 6–10 ft
This underground area naturally stays cool.
2. Build thick insulated walls
Use a mixture of:
• clay
• sand
• lime
• ash
• straw
This mixture is waterproof and heatproof — the same used in old Persian yakhchāls.
Make the walls 50–80 cm thick.
3. Create a dome over the pit
The dome shape:
• pushes hot air upward
• keeps cold air trapped down
You can make the dome with:
• clay bricks
• mud + straw layers
• thatch roofing (cheap option)
4. Add a small ventilation hole
Keep it very small.
This removes moisture but keeps the cold inside.
5. Fill the pit with layers of ice + straw
Straw prevents ice blocks from sticking to each other.
6. Seal the entrance during summer
Opening it only when needed keeps ice safe for months.
⸻
PART 4: Why This Works (Simple Explanation)
The system works because of three powerful natural laws:
1. Underground is cold
The deeper you go, the cooler it gets.
2. Thick clay walls stop heat
Clay removes heat very slowly.
3. Evaporation cools air
Clay absorbs moisture and releases it, dropping temperature inside.
Together, this becomes a natural refrigerator.
⸻
PART 5: Can Anyone Build This Today? Yes.
You don’t need electricity
You don’t need machinery
You don’t need expensive materials
You only need:
• Clay
• Sand
• Water
• Straw
• A cold night
• A little work
This is extremely useful for:
• Villages without electricity
• Disaster zones
• Nomads
• Farms
• Places with water shortages
• Eco-friendly homesteads
• Outdoor camps
⸻
PART 6: Modern Improvements You Can Add
If you want even better results:
1. Paint the dome white
White reflects heat.
2. Add a double-layer wall
Air trapped between two clay walls increases insulation.
3. Add a small solar chimney
This pulls hot air upward and out.
4. Use bamboo mats inside
This adds humidity control.
0 Comentários
0 Compartilhamentos
40 Visualizações